This write-up applies to 2010 – 2013 Legacy GT models with 2.5 turbocharged engine. A stock engine engine/tune is unlikely to benefit from changing you bypass valve.
Replacing the factory turbo Bypass Valve (aka blow-off valve or BOV) is far easier than I initially thought. Whether or not you should is hotly debated, but it’s really up to you. My custom tuned Cobb Stage II was leaking boost and this fixed it, but that may have been due to the age of the original more than the design. Here’s how you do it (since I couldn’t find any other overview):
Parts needed:
1.) New bypass valve. I went with the GFB Hybrid (T9233) because it allows me to use either hybrid or full recirculation easily.
2.) Spare plastic body fasteners. (You may break some during removal of the intake snorkel)
3.) Zip tie or small hose clamp (optional, see step 11)
Tools needed:
1.) 8mm socket or nut driver (snicker)
2.) 10mm (socket and ratchet)
3.) 12mm (socket and ratchet)
4.) Screwdriver or similar tool to pry fasteners and hoses
5.) Vice grips (recommended) or pliers
Steps:
1.) Remove the 2 plastic fasteners for the cool air intake snorkel, then lift it out.
2.) Remove the passenger side radiator fan by disconnecting the electrical connector in the bottom corner. Then remove the 2 10mm bolts on the top. Lift the radiator fan straight up to remove.
3.) You can now easily access the Bypass Valve from above:
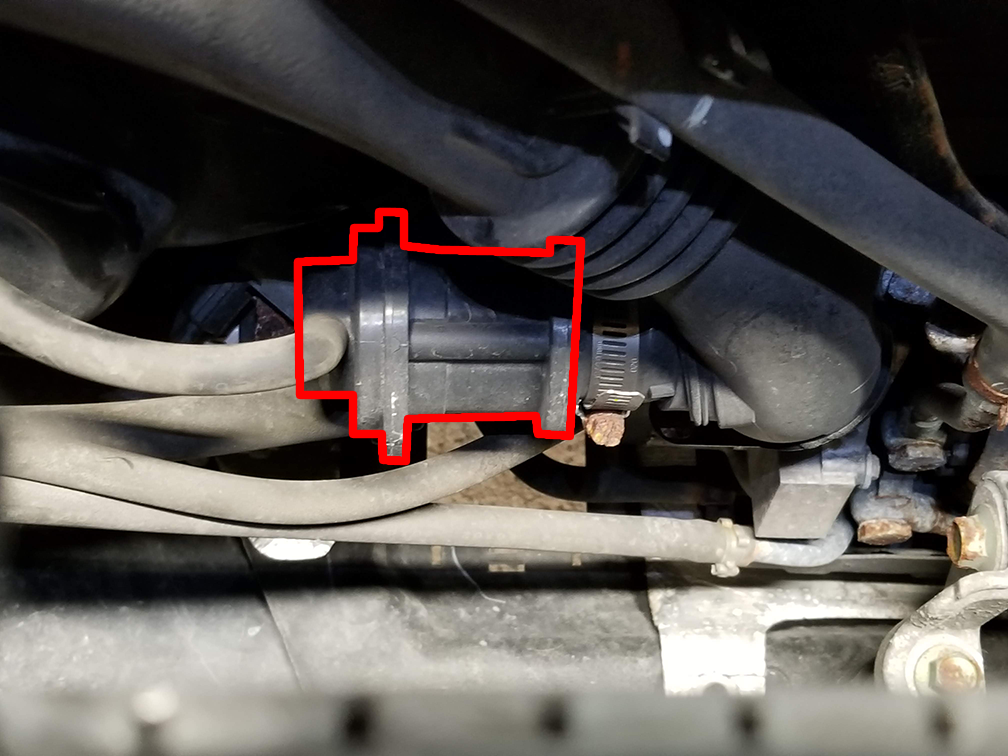
4.) Slip the vacuum line off of the Bypass Valve.
5.) Use an 8mm socket or nut driver to loosen the upper hose clamp on the Bypass Valve.
6.) Wiggle the upper Bypass Valve tube out of the hose while gently prying the hose with a screwdriver. There’s a lot more flex in the lower hose than you expect. It will allow you to pull the upper hose off of the Bypass Valve and pull it aside to access the lower hose clamp.
7.) Use your vice grips to lock the spring-style lower hose clamp open… or try to do the same with pliers. Wiggle the lower hose off of the factory Bypass Valve.
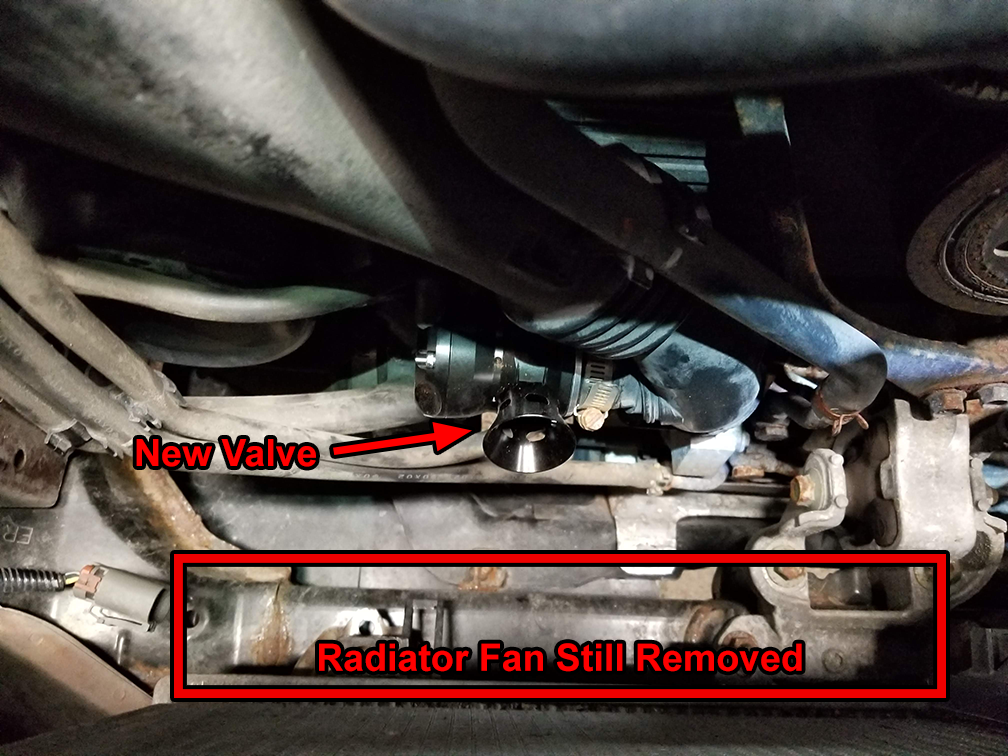
8.) Compare the orientation of the inlet and outlet to your factory Bypass Valve. Also ensure that the vacuum line is aligned. Most aftermarket Bypass Valves allow you to rotate the vacuum line as needed if you remove a few screws. Follow the manufacturer’s instructions. The GFB Hybrid (T9233) did not require any adjustment.
9.) Insert the new Bypass Valve into the lower hose and align it with the upper hose. Remove your vice grips from the lower spring-style lower hose clamp.
10.) Insert the new Bypass Valve into the upper hose. Tighten the 8mm hose clamp so that it is snug. No need to go gorilla on it.
11.) Slip the vacuum line onto the vacuum inlet on the new Bypass Valve. A zip tie or small hose clamp may be necessary to ensure a good seal if the outer diameter of the inlet is smaller than the stock Bypass Valve.
12.) Install the passenger-side radiator fan: slide it straight down into place. Reinstall the 2 10mm bolts on the top. Re-connect the electrical connector on the lower corner of the fan.
13.) Re-install the intake snorkel and secure it with 2 plastic fasteners.
14.) If your Bypass Valve spring requires tuning, follow the instructions provided by the manufacturer. My throttle response benefited from a slightly tigher spring. It held boost without any adjustment, though.
Here’s how the hybrid sounds (not too loud) with a full Invidia exhaust:
- Duane