Leinninger.com

Search Results

June 21st, 2022:
Homelab Outage and Recovery

Last Wednesday my AC didn’t work either because of the load buffer module (SMM) that delays turning the AC on if the generator has been activated. Normally, it keeps the AC from switching on immediately and drawing too much juice when the generator hasn’t fully started. In this case, it failed and defaulted to “open” meaning no power to the AC. Hopefully, Generac will extend warranty work because of the failed units and replaced it with a default “closed” SMM (so the AC won’t be unavailable if it fails again). I called the generator service company and they had a repairman schedule to visit the next day.

esxi vmware homelab

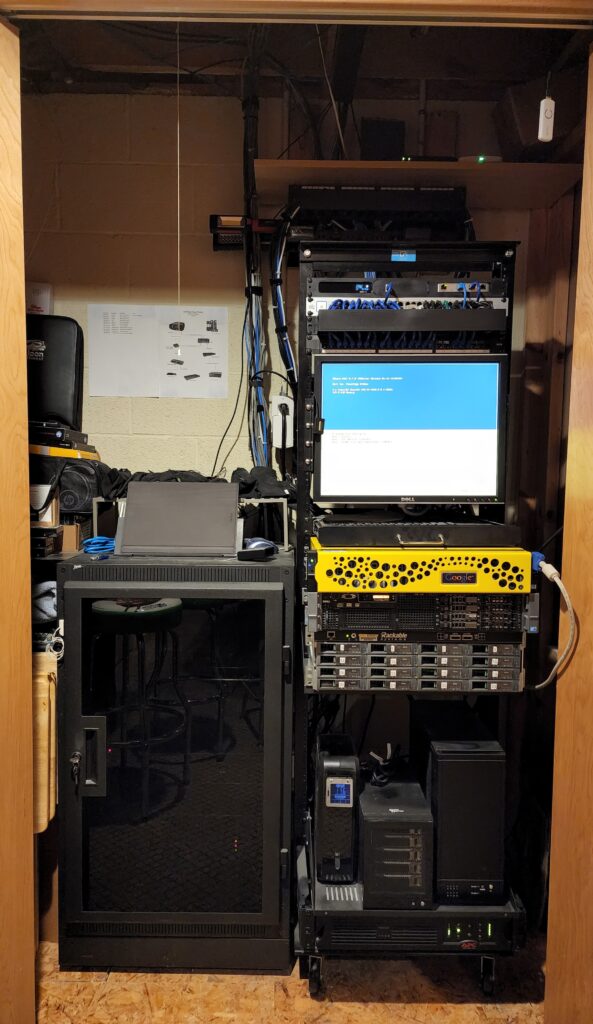
That repair was supposed to take “5 – 10 minutes.” The UPS on my homelab server rack is good for 15 minutes or so. Around 12 minutes into the repair, it started beeping like crazy and my whole lab shut off without powerdown. (ESXi VM server which includes media server, automation server, web server and DNS/Pihole VMs plus the SAS array of storage.) Servers don’t like when that happens. It wouldn’t post when I tried to boot. I really, really should have shut everything down in advance… but I wanted to save my over 600 days of uptime on the VM host!

After I got home from a weekend of racing, I spent several hours getting it back up and running by pulling hardware, re-installing VMware to new SD cards (it boots from internal SD cards), running diagnostics on the RAID arrays, etc. Luckily I had the DNS and Web Server VMs backed up to another server and powered that on to cover me for the weekend… but I thought I was screwed. (None of that effort contributed to the solution.)

The fix was to run the Lifecycle Manager… which is a Dell EMC server feature that walks you through server setup and maintenance. I don’t think I used it since I set up the server! It walked through the automated firmware upgrade and it reinstalled BIOS, etc. That unexpected process allowed me to post. I just had to mark all of the disks in my RAID arrays as “good, offline” and re-scan the foreign configuration and I was back online.

Lessons learned:

  1. Backups are important! I have the backup server which allowed me to get up and running on Thursday so I could keep working from home. But, I had no home automation or media server… they rely on hardware that doesn’t work in the spare server. If all else failed, I also have online “cold storage” backups for everything, but the recovery time for those can be weeks or months.
  2. Don’t get too dependent on home automation. 2 of my automated light switched have gone bad (Insteon units which I need to replace and re-configure with Z-Wave). I was able to control them with Amazon Echo commands though… if my server was online. Also, our automated cat feeder is dependent on the automation server. We were gone for a weekend and had to leave bowls of food out for them. I bet it was gone in the first 24 hours.
  3. My daughter’s birthday was on Sunday (6 years old!). While at the racetrack. she made up her mind that she wanted to watch dvd rips of the Gummi Bears when she got home. When we got home on Sunday afternoon, her world fell apart because I didn’t get the server back online yet. I’m working on setting her expectations that the world of entertainment offered by the server is a convenience and isn’t always available when she has screen time.
  4. Practice makes perfect. I haven’t had to perform any significant maintenance on my ESXi host for almost 2 years. In the future, I’ll practice more frequent roll-overs to my backup host and add a USB controller that matches the one in the primary host for automation interfaces. Then, I’ll only be without a media server if this happens again (see #3 above).

Like any other hobby, running a homelab can be a lot of work. I’ve become VERY dependent on the main VMs that run on my host. Most of the experimental hosts could be lost and I could easily start over with them to play with Docker and K8s, etc. I’ll have to make the routine maintenance part of the “fun” of my homelab, too.

October 19th, 2016:
Upgrade Amibian and Enable WiFi

UPDATE 12/1/17: Amibian 1.4 (or newer) is available, has wifi support and the latest Jessie updates plus a ton of great new feature that make it easier to use than my instructions below!!!!

In my previous post I outlined the (many) steps involved in setting up a raspberry pi 3 in a pi-top laptop case as an Amiga laptop. Since, I can't leave well enough alone, I decided that I wanted to get wifi working and make sure my distribution was more up-to-date than the official Amibian distribution offered. Here are the steps I took to make this happen (at least the steps that I can remember):

It might be worthwhile to use Win32DiskImager (or equivalent) to make a backup of your SD card before trying this. I did and it gave me great peace of mind.

Update Your Pi

(Make sure your connected to a network with Ethernet. Each step will take a while to execute... that's normal.)

  1. "apt-get update"
  2. "apt-get upgrade"
  3. "apt-get dist-upgrade"
  4. "apt-get install rpi-update"
  5. "rpi-update"
Fix Automatic Login
  1. Login using the Amibian defaults: root/1234... or whatever you've changed them to
  2. Edit (see the previous article for file editing from the shell) /etc/systemd/system/getty.target.wants/getty@tty1.service as such:
    1. Change the "ExecStart=" line to: "ExecStart=-/sbin/agetty --autologin root %I"
    2. Change the "Restart=" line to: "Restart=no"
  3. Save and exit the editor
  4. "reboot"

Functionally, you should be back to where you were before starting the upgrade process: Your computer boots and automatically starts the Amiga Emulator. Note, however, that when you quit the emulator "exit" no longer restarts the emulator. Instead it exits the current terminal session. If you want to restart the emulator, just execute your startup script with "/bin/bash ~/.profile". If you accidentally type "exit" out of habit and want to get back into a terminal session, press alt-fn-F2 (or any other alt-function-key combination) to switch to a different terminal session.

Install The Wireless Stuff

These instructions assume that you're using a Raspberry Pi 3 with a built-in wifi interface. Other adapters might be able to leverage some of this info, but the firmware parts probably won't apply.

  1. Install the wireless tools package: "apt-get install wireless-tools"
  2. Install wpa supplicant for secured wireless networks: "apt-get install wpasupplicant"
  3. Configure your wireless connection:
    1. Create and edit a wireless network config file named "/etc/wpa_supplicant/wpa_supplicant.conf" that contains:
      ctrl_interface=/var/run/wpa_supplicant
              ctrl_interface_group=0
              update_config=1
      
              network={
                ssid="network_id"
                psk="password"
                proto=WPA
                key_mgmt=WPA-PSK
                pairwise=TKIP
                group=TKIP
                id_str="Nickname"
              }
    2. Change "network_id" and "password" to your access point's SSID and passphrase. Keep the quotes around the values in that file, though!
  4. Configure your wireless network interface:
    1. edit "/etc/network/interfaces"
    2. Change or add the wlan0 section to...
      auto wlan0
                  iface wlan0 inet dhcp
                  wpa-conf /etc/wpa_supplicant/wpa_supplicant.conf
  5. Unplug your Ethernet and "reboot"
  6. When your computer restarts, Quit the emulator and test your wireless configuration from the shell with: "ifconfig -a". You should see something like:
    eth0      Link encap:Ethernet  HWaddr b8:27:eb:07:e5:49  
              UP BROADCAST MULTICAST  MTU:1500  Metric:1
              RX packets:0 errors:0 dropped:0 overruns:0 frame:0
              TX packets:0 errors:0 dropped:0 overruns:0 carrier:0
              collisions:0 txqueuelen:1000 
              RX bytes:0 (0.0 B)  TX bytes:0 (0.0 B)
    
    lo        Link encap:Local Loopback  
              inet addr:127.0.0.1  Mask:255.0.0.0
              inet6 addr: ::1/128 Scope:Host
              UP LOOPBACK RUNNING  MTU:65536  Metric:1
              RX packets:8 errors:0 dropped:0 overruns:0 frame:0
              TX packets:8 errors:0 dropped:0 overruns:0 carrier:0
              collisions:0 txqueuelen:1 
              RX bytes:1104 (1.0 KiB)  TX bytes:1104 (1.0 KiB)
    
    wlan0     Link encap:Ethernet  HWaddr b8:27:eb:52:b0:1c  
              inet addr:192.168.0.45  Bcast:192.168.0.255  Mask:255.255.255.0
              inet6 addr: fe80::ba27:ebff:fe52:b01c/64 Scope:Link
              UP BROADCAST RUNNING MULTICAST  MTU:1500  Metric:1
              RX packets:14966 errors:0 dropped:9 overruns:0 frame:0
              TX packets:1307 errors:0 dropped:0 overruns:0 carrier:0
              collisions:0 txqueuelen:1000 
              RX bytes:1728707 (1.6 MiB)  TX bytes:171182 (167.1 KiB)
    With an IP address properly configured for wlan0.

There you have it! The official Amibian distribution will be updated soon, but I couldn't wait. If this all seems a little over your head, it might be worth waiting for a packaged solution such as theirs. Please comment with corrections, suggestions, and feedback! Happy Amiga-ing!

August 30th, 2016:
Lessons Learned By A New Father (Part 1)

Here’s the first installment of stuff I’ve learned in the past 10 weeks of new fatherhood:

    Stay Puft Baby and Dad
  1. The first 2 weeks are tough. More difficult than you can imagine. Everyone says this. You think you know what it means. You’re wrong.
  2. Weeks 3-4 are better than the first two… but your brain will be erased and you won’t remember how bad 1 & 2 were. Weeks 3-4 are about as bad as you imagined 1-2 could be before baby arrived.
  3. After week 6, it gets a lot better. You come out of the haze and really realize that this new person is in your family. By week 10, you’re interacting with her and you can barely remember the first month.
  4. Take lots of pictures/videos. Everyone tells you that it goes by so fast and they grow too quickly. It’s true.
  5. Diapers aren’t as bad as you imagined… especially if baby is nursing. The first few days are a horror show (meconium), but really, it’s not too bad.
  6. There will be blow outs… big time. My wife is a scientist and bought a case of “blue pads” used for surgeries, etc. We put them on the changing pad as well as line her car seat with them. Keep a few in your diaper bag for impromptu changing. Lastly, make sure the “seal” around baby’s legs is good by pulling the diaper up on her waist after securing it… like you’re putting a pair of shorts on her. Nothing can stop the dreaded “rooster tail”… it’s just going to happen some day(s).
  7. Gripe water works. All of the articles/books I read said that there’s no scientific evidence for it to work (our baby showed no signs of colic, so that may be a different story), but a dose of gripe water and a little patting on the back and she produces some of the most amazing belches and stops crying
  8. Your wife will need a break… especially if she’s nursing. As soon as you can prepare a bottle and baby is ready to accept it (check with your pediatrician), offer to take the last feeding of the night and put her to bed… or tell your wife to go out shopping for herself and stay home and feed baby. (Just make sure you time everything right so that you have enough milk and/or mom comes back in time.)
  9. A bedtime routine is key. Our baby has slept in her room, in her crib, since she was 2 weeks old (before that we tried a bassinet in our room). Having a bedtime routine was key to making that happen. On bath night, she gets a warm bath… but otherwise, it’s the same every night: mom puts on a lullaby and dims the lights. I undress baby and change her diaper (if needed). Mom applies night time lotion. I put baby in her swaddle. Mom feeds baby. Usually she’s asleep by the end of the feeding and mom waits 20 minutes, then puts her in her crib. 90% of the time, that works. The other 10%… well… all bets are off
  10. Speaking of swaddles: they work… just be sure that you follow the instructions for your swaddle blanket or quick-swaddle. Talk to your pediatrician about positioning baby’s head. Baby should always sleep on her back.
  11. We found out about swaddles in on of our classes, but we also learned about the 5 S’s for getting baby to calm down/sleep from “The Happiest Baby On The Block” by Dr. Harvey Karp: Side, Swaddle, Shush, Swing, Suck. Look it up… it helps, but as you’ll find, nothing is a guaranteed solution
  12. We’ve always cooked dinner together, and doing that with baby is a challenge. We found that a bouncer or car seat on the kitchen counter (if you have space) works well. We tried wearing her in a front-carrier, but worried about hot spatter from pans could get her. Of course, be careful with cutlery, spices, or other hot liquids.
  13. Bonding time helps. If you’re only holding baby when she’s crying, that’s all that you’re going to get out of it. Make time to play with baby (tummy time included) and I find that just a minute of fun when changing diapers or getting dressed means a lot before my day starts or before baby goes to bed.
  14. Teamwork helps. My wife and I have always teamed up: hobbies, chores, projects, and now baby. We calm each other down and cover for each other when we’ve just had enough. Teamwork can be fun too… and makes bath time a lot safer.

Well, that wraps up my first installment of lessons learned. There’s a ton more and I’ll try to provide ongoing updates.

May 1st, 2015:
I miss blogs, dammit.

I had an old blog and was pretty good at updating it. It used my personal framework instead of a mainstream, feature-packed system like WordPress. It was modular and linked to friends’ blogs. They were all pretty good at updating their blogs too.

What happened?

One explanation is simple: we don’t have time any more. We’re old. We have families to spend time with. There are more complicated hobbies to maintain. We write (good) code all day long and don’t need that special fix that we used to crave.

Another explanation? WordPress is less fun. It’s not my personal code sandbox. I don’t take pride in the feature set… I just download another plug-in and enable it. I don’t have friends providing feedback on what’s working vs. what could be better… and when they do, I don’t take it personally.

Does this post mean I’ll try harder to make blog posts? Maybe… but with the summer (and race season) starting soon, I make no promises…

September 1st, 2009:
Media Center solution: less hacky, but still pretty hacky…

We’ve been using Windows Media Center for about 5 years. At first, we were stuck with standard definition recorded via s-video from our set top box. Later, a friend told me about this solution that records HD via firewire in a very hacky way. A new solution allows us to use a cable card-based digital tuner to record and watch live TV on all of our extenders in HD. Comcast came out and had us set up very quickly with a working digital tuner in our media center PC.

For the sake of over information: the digital tuner is hooked up to my Windows Media Center server in my basement which feeds my extenders. Nobody actually watched TV on that monitor (it’s an old 17″ Dell) and runs at 1280×1024… to VGA works just dandy for this purpose. Before I was using the FireSTB hack that John told me about. The catch was … Read Morethat I couldn’t watch live TV in HD because of the weird way it recorded SD and HD in parallel, then deleted the SD file after it was done recording, replacing it with the HD version. The hack also let me change channels (usually) via firewire instead of IR blasting. Unfortunately, the hack also turned the volume on my cable set top box down one “click” each time it changed channels, effectively muting SD recordings after a few days. The digital tuner solution fixes all of these issues. The catch? Technically, you’re supposed to have an OEM media center PC with “supported” DRM-friendly bios. There are now workarounds for this…

Devtroit