Leinninger.com

October 19th, 2016:
Upgrade Amibian and Enable WiFi

UPDATE 12/1/17: Amibian 1.4 (or newer) is available, has wifi support and the latest Jessie updates plus a ton of great new feature that make it easier to use than my instructions below!!!!

In my previous post I outlined the (many) steps involved in setting up a raspberry pi 3 in a pi-top laptop case as an Amiga laptop. Since, I can't leave well enough alone, I decided that I wanted to get wifi working and make sure my distribution was more up-to-date than the official Amibian distribution offered. Here are the steps I took to make this happen (at least the steps that I can remember):

It might be worthwhile to use Win32DiskImager (or equivalent) to make a backup of your SD card before trying this. I did and it gave me great peace of mind.

Update Your Pi

(Make sure your connected to a network with Ethernet. Each step will take a while to execute... that's normal.)

  1. "apt-get update"
  2. "apt-get upgrade"
  3. "apt-get dist-upgrade"
  4. "apt-get install rpi-update"
  5. "rpi-update"
Fix Automatic Login
  1. Login using the Amibian defaults: root/1234... or whatever you've changed them to
  2. Edit (see the previous article for file editing from the shell) /etc/systemd/system/getty.target.wants/getty@tty1.service as such:
    1. Change the "ExecStart=" line to: "ExecStart=-/sbin/agetty --autologin root %I"
    2. Change the "Restart=" line to: "Restart=no"
  3. Save and exit the editor
  4. "reboot"

Functionally, you should be back to where you were before starting the upgrade process: Your computer boots and automatically starts the Amiga Emulator. Note, however, that when you quit the emulator "exit" no longer restarts the emulator. Instead it exits the current terminal session. If you want to restart the emulator, just execute your startup script with "/bin/bash ~/.profile". If you accidentally type "exit" out of habit and want to get back into a terminal session, press alt-fn-F2 (or any other alt-function-key combination) to switch to a different terminal session.

Install The Wireless Stuff

These instructions assume that you're using a Raspberry Pi 3 with a built-in wifi interface. Other adapters might be able to leverage some of this info, but the firmware parts probably won't apply.

  1. Install the wireless tools package: "apt-get install wireless-tools"
  2. Install wpa supplicant for secured wireless networks: "apt-get install wpasupplicant"
  3. Configure your wireless connection:
    1. Create and edit a wireless network config file named "/etc/wpa_supplicant/wpa_supplicant.conf" that contains:
      ctrl_interface=/var/run/wpa_supplicant
              ctrl_interface_group=0
              update_config=1
      
              network={
                ssid="network_id"
                psk="password"
                proto=WPA
                key_mgmt=WPA-PSK
                pairwise=TKIP
                group=TKIP
                id_str="Nickname"
              }
    2. Change "network_id" and "password" to your access point's SSID and passphrase. Keep the quotes around the values in that file, though!
  4. Configure your wireless network interface:
    1. edit "/etc/network/interfaces"
    2. Change or add the wlan0 section to...
      auto wlan0
                  iface wlan0 inet dhcp
                  wpa-conf /etc/wpa_supplicant/wpa_supplicant.conf
  5. Unplug your Ethernet and "reboot"
  6. When your computer restarts, Quit the emulator and test your wireless configuration from the shell with: "ifconfig -a". You should see something like:
    eth0      Link encap:Ethernet  HWaddr b8:27:eb:07:e5:49  
              UP BROADCAST MULTICAST  MTU:1500  Metric:1
              RX packets:0 errors:0 dropped:0 overruns:0 frame:0
              TX packets:0 errors:0 dropped:0 overruns:0 carrier:0
              collisions:0 txqueuelen:1000 
              RX bytes:0 (0.0 B)  TX bytes:0 (0.0 B)
    
    lo        Link encap:Local Loopback  
              inet addr:127.0.0.1  Mask:255.0.0.0
              inet6 addr: ::1/128 Scope:Host
              UP LOOPBACK RUNNING  MTU:65536  Metric:1
              RX packets:8 errors:0 dropped:0 overruns:0 frame:0
              TX packets:8 errors:0 dropped:0 overruns:0 carrier:0
              collisions:0 txqueuelen:1 
              RX bytes:1104 (1.0 KiB)  TX bytes:1104 (1.0 KiB)
    
    wlan0     Link encap:Ethernet  HWaddr b8:27:eb:52:b0:1c  
              inet addr:192.168.0.45  Bcast:192.168.0.255  Mask:255.255.255.0
              inet6 addr: fe80::ba27:ebff:fe52:b01c/64 Scope:Link
              UP BROADCAST RUNNING MULTICAST  MTU:1500  Metric:1
              RX packets:14966 errors:0 dropped:9 overruns:0 frame:0
              TX packets:1307 errors:0 dropped:0 overruns:0 carrier:0
              collisions:0 txqueuelen:1000 
              RX bytes:1728707 (1.6 MiB)  TX bytes:171182 (167.1 KiB)
    With an IP address properly configured for wlan0.

There you have it! The official Amibian distribution will be updated soon, but I couldn't wait. If this all seems a little over your head, it might be worth waiting for a packaged solution such as theirs. Please comment with corrections, suggestions, and feedback! Happy Amiga-ing!

- Duane

October 14th, 2016:
How To Build An Amiga Laptop Using Raspberry Pi 3

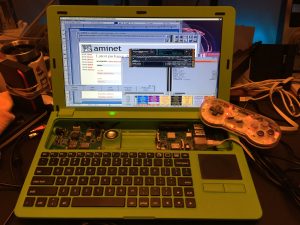
My wife tells me that I've been overcompensating for my adolescent technolust now that I can actually afford some gadgets. I'm not arguing... especially with my latest project: an Amiga laptop that gets about 10 hours of battery life. I wanted an Amiga so badly when I was younger. They were expensive though and I made do with my Commodore 64c. I've since owned 4 Amigas (A600, A1200, A2000 w/ Video Toaster and A4000T w/ Video Toaster), and still own 2 of them. When laptops became more attainable, I lusted for one as well... finally buying on with my web development earnings in 1997. So, I figured that there must be some way to combine two of my fixations into one sill creation: The Amibian Laptop.

Amibian Laptop

WARNING: Always properly shut down your Pi from the command line before powering off. SD Cards tend to corrupt when abruptly powered off while reading/writing. The commands are simple: "poweroff" (turns off the power) and "reboot" restarts the Pi. Note: I used Windows to prepare my SD card, the references to software below are based on this platform. Linux, and Mac OS both have solutions that can be found with a little search engine effort.

The Parts

  1. Pi-Top Laptop Case (includes keyboard, 13" display, touchpad, and interface for rpi). I also recommend buying a pi-top speaker.
  2. Raspberry Pi 3 (Model 3 has the best performance and can be purchased from pi-top above or separately for less convenience and possibly a lower price)
  3. A heatsink for the Pi. (It gets quite hot when emulating.)
  4. A good-sized micro-sd card. I like having a few around to experiment with new versions and make backups. 32-64 gigs will store every WHDLoad game and demo ever made with room to spare for MOD files and Deluxe Paint.
  5. A 1080p hdmi display (might work with other television resolutions, but I used a 1080p monitor... more on this later)...
  6. An Ethernet cable to copy software, games, music, etc. once you're set up.

The Software

  1. Amibian! So far the most direct, lightweight, and best performing UAE image I've used.
  2. SD Card Formatter
  3. A way to extract the Amibian RAR file such as 7-Zip for Windows, The Unarchiver for MacOS or just use unrar for Linux.
  4. Software to write the image file to your micro sd on aWindows, Mac or Linux system.
  5. Kickstart ROMs. This is the "bios" (and part of the operating system) for Amiga computers. There are 2 ways to get these legally, both via Cloanto. I used the Amiga Forever distribution, which is a great product in and of itself (get the "plus" version at least to ensure you get all of the kickstart versions for WHDLoad). Alternatively, you can buy the Amiga Forever Essentials for Android and extract the ROM files for a little less money. I haven't done it, so your mileage may vary.
  6. Workbench 3.1 adf files. This is the operating system that we will install. ADF stands for Amiga Disk File. Workbench 3.0 will work too, but 3.1 has some nice refinements. Cloanto's Amiga Forever Plus distribution includes Workbench 3.1 adf files.
  7. Classic Workbench from Bloodwych. I recommend the UAE build available here.

The Process

Assembly and Basic Set Up
  1. Assemble your pi-top following the latest instructions provided. Of course, you don't need a pi-top to make a modern Amiga emulation box, but c'mon... IT'S AN AMIGA LAPTOP!!!
  2. Boot into pi-top os using the provided micro-sd card. Make sure everything works. Read the inside of the pi-top speaker box to install the software for the speaker. Make sure your audio is working in pi-top os (go to youtube or something) before you try setting it up for Amibian. Knowing your hardware is working beforehand might save you some time later.
  3. Using another computer, format your new, larger micro-sd card using SD Card Formatter (see software, above).
  4. Extract the Amibian image file downloaded in step 1 of The Software, above, using the unRAR software from step 3, above.
  5. Image your freshly formatted micro-sd card with the extracted image using the software from step 4 above. Note: Windows users will probably not be able to mount the .img file, nor read the micro-sd card once you have imaged it. Windows will likely even tell you that it is corrupt. If you've followed these instructions, I'm 91.675% certain it's not corrupt as you'll see in a few steps. Linux users need not worry, but honestly, you're probably used to doing things the hard way and will have a blast with this...
  6. Insert the new Amibian-imaged micro-sd card into your pi-top (if you use the ethernet method below, connect an ether cable before powering on) and turn it on. You pi-top screen is going to look bad... like "OMG, I just cooked this thing" bad. But, Amibian is just configured with a really incompatible screen mode by default. Here's where that 1080p display comes in handy:
    1. Disconnect the pi-top display from the raspberry pi board's hdmi connector and plug in your HDMI 1080p display. You should now see the uae4arm-rpi menu.
    2. Click "quit". (Pro-tip: once you've quit UAE, you can restart from the shell by simply typing "exit"... or just type "reboot" to reboot and UAE will start automatically, again.
    3. From the command line/shell prompt, use your favorite (cough-VI-cough) text editor to modify /boot/config.txt. (If you don't know how to use vi, which is built-in to this distribution, install "nano" with "apt-get install nano". Open the file to edit by typing "nano /boot/config.txt". Move around the file with the cursor keys. Save and exit by pressing "ctrl-k", then "x". To cancel (exit without saving), press "ctrl-c".)
    4. Add "hdmi_drive=2" (without the quotes, of course).
    5. Change "hdmi_group=1" to "hdmi_group=2".
    6. Change "hdmi_mode=16" (or whatever it is by default, I don't remember) to "hdmi_mode=81".
    7. For more information on these settings check out https://www.raspberrypi.org/documentation/configuration/config-txt.md.
    8. Save your changes
    9. Type "reboot"
    10. Your pi-top should reboot and be quite nice to look at now.
    11. Follow the instructions on the Amibian site to get your system set up. I'll also cover what worked for me in the steps below as of the time of this writing.
  7. From the uae4arm-rpi menu, click "quit" (again) and type "raspi-config" and press enter
  8. Choose "Expand Filesystem" to let the Rasbian installation expand to fill your entire micro-sd card.
  9. While you're in the config screens, change a few settings that will help later:
    1. Configure your location and keymap in Internationalsation Options
    2. Enable SSH in Advanced Options -> SSH (you'll need this for SFTP/copying files and remote management of your PI, the username is "root", the password is "1234"... really...)
    3. Enable SPI (Advanced Options -> SPI) which will allow you have your laptop automatically poweroff when you poweroff your Pi as well as adjust display brightness.
    4. Enable I2C (Advanced Options -> I2C) which you will need for your pi-top speaker (pt-speaker) to work.
    5. Set your audio to "auto" (Advanced Options -> Audio) so that you can choose your audio output manually later if needed.
    6. "Back" out of the setting menus and click on "Finish". You will be prompted to reboot, which you should do.
Amibian/uae4arm-rpi Configuration

Reality check time: you should have a booting system with a display that is working at native resolution in the shell and use4arm-rpi menu. We've set up your kernel modules for sound and power control. It's time to install Workbench (Amiga OS). You can simply install a vanilla version of Workbench 3.1 using the adf files from Amiga Forever Plus, but I will be detailing the instructions for the beautiful Magic Workbench for UAE from Bloodwych. Either way, you're going to need the Workbench ADF files...

Here are the modified instructions from Bloodwych to configure both a Picasso 96 (fancy, hi-res desktop) install as well as a more compatible ADVSP install (that you can switch between):

  1. Unpack the archive by double clicking its icon (do this on your regular computer)
  2. Place an uncompressed 3.0 (or 3.1) ROM file into the ROMS directory (on your pi-top), renaming it "kick3.rom" (I copied amiga-os-310-a1200.rom from the Amiga Forever Plus "shared" directory to my pi-top's "/root/amiga/kickstarts" directory using sftp, then renames it to "kick3.rom"... if you have the space, just copy all of the rom files over. You'll be using some of them to set up WHDLoad later. Then create a directory in /root/amiga called "hdd". Copy "System_ADVSP.hdf" and "System_P96.hdf" from the unpacked Classic Workbench folder (ClassicWB_UAE_v28) to "/root/amiga/hdd" on your pi-top using sftp. Copy the entire "Software" directory from Classic Workbench's "Hard Disk" directory to "/root/amiga/" on your pi-top. Finally, copy the Workbench ADF files from Amiga Forever Plus's "shared" folder to the "/root/amiga/floppys" directory on your pi-top using the same method.)
  3. (Start or restart your pi-top. Remember, if you're already in the UAE menu, click "quit", then type "reboot" and press enter.)
  4. (Go "Configurations" in the left menu and click on "Run Me First, then Delete" ONCE.)
  5. Select "Paths" from the left hand menu - tick "Use relative paths" and click "Reset to defaults" (This step doesn't apply to uae4arm-rpi. Instead, select "ROM" from the left hand menu. Then click on the "..." button, navigate to "/root/amiga/kickstarts" and choose kick3.rom. Click on "Hard drives" in the left menu and navigate to "/root/amiga/hdd" and choose "System_P96.hdf" for DH0:, "root/amiga/Software" for DH1 and "/root/amiga/PC" for the device named "PC". Select "Configurations" and save.
  6. When asked to insert a Workbench 3 disk, hit F12 (use the "fn" key to get F12 to work), enter the Floppy Drives tab and select an ADF for DF0: (Select "amiga-os-310-workbench.adf" that you copied to "floppys" above. I ran through the entire installation process following the instructions when prompted until it told me to remove the Workbench disk and reboot.)
  7. Go to the "Configurations" section and double-click/load (single click) "Run Me Second then Delete"
  8. Select "ROM" from the left hand menu. Then click on the "..." button, navigate to "/root/amiga/kickstarts" and choose kick3.rom. Click on "Hard drives" in the left menu and navigate to "/root/amiga/hdd" and choose "System_ADVSP.hdf" for DH0: this time, "root/amiga/Software" for DH1 and "/root/amiga/PC" for the device named "PC". Select "Configurations" and save.
  9. Click "Restart" and follow the on-screen instructions.
  10. When asked to instert a Workbench 3 disk, hit F12, enter the Floppy Drives tab and select an ADF for DF0: (Select "amiga-os-310-workbench.adf" that you copied to "floppys" above.)
  11. In the "Configuration" menu, select, then "Load" each of the A1200 and A4000 configurations. Using the information from the steps above, then select the appropriate Kickstart ROM (kick3.rom should work, or you can try the other ROMs available if you like) and fix the paths for the Hard Drives.
  12. Pat yourself on the back, grab your favourite bev and enjoy! (Whew! That was a lot of work!)
Making It Pretty

From here on out, you have a working Amiga laptop. Be sure that you "Quit" UAE from the F12 menu, and "Shutdown" from the shell/command line before powering off your pi-top!

Time for another reality check. You're practically a pro at this stuff now. You should now be able to boot into one of your configurations. I prefer the A4000 Turbo, myself. You probably wish it was a little higher, resolution, right. Well, here's how we do that:

  1. In your emulated Amiga, open the "System" hard drive icon on the left. Then open "Prefs", followed by "ScreenMode". In the left-hand menu, scroll down and select "UAE: 1024x768 32bit RGBA", then click "Use". This doesn't save the setting, so if you reboot, you'll be back at the lower-resolution ScreenMode. If everything looks good, open the "ScreenMode" Pref again, select "UAE: 1024x768 32bit RGBA" and click "Save"... now it will stick.
  2. If you prefer to use every pixel of your display (like I do), you can change the aspect ratio in your UAE settings. Press fn+F12 (which I'll just refer to as F12 from now on) to open the UAE menu. Make sure you've selected the correct configuration, then select the "Display" category from the left. Uncheck "4/3 ration shrink". Return to the "Configuration" menu and click "Save". If you like, you can mess around with the other settings in the "Display" section, but make sure you either save your settings or write them down beforehand. If you want a more accurate display, you can re-check "4/3 ratio shrink" any time you feel the need.
Optional: Tweaking Your Setup (Sound, Power and Display Brightness)

This section is optional, but I believe it really completes the configuration. Without making these changes, you will need to manually power off your pi-top when shutting down, your display won't be as bright as it could be, and you will need to use your headphones instead of the pt-speaker.

Display Brightness
  1. The detailed instructions can be found here. I've summarized them for reference with additional notes specific to Amibian. The installation scripts and instructions on github assume you're using the normal Raspberian distribution, which we are not.
  2. Quit UAE (F12, click "Quit").
  3. From the shell prompt, type "mkdir Downloads", this creates a Downloads directory
  4. Type "apt-get install wiringpi git "
  5. "cd Downloads"
  6. "clone git://github.com/rricharz/pi-top-install"
  7. "cd pi-top-install"
  8. "chmod +x install*"
  9. "apt-get update"
  10. "apt-get upgrade"
  11. "cp brightness /usr/bin"
  12. "chmod +x /usr/bin/brightness"
  13. You can now adjust your display brightness with "brightness [0-10]" (use a number between 0 and ten to set brightness directly) or just "brightness increase" and "brightness decrease".
Auto Poweroff When You Shutdown
  1. "cd /root/Downloads/pi-top-install"
  2. "mkdir /opt/pi-top"
  3. "cp poweroff /opt/pi-top"
  4. "chmod 755 /opt/pi-top/poweroff"
  5. "systemctl disable pt-poweroff.service"
  6. "cp pt-poweroff.service /lib/systemd/system"
  7. "cd /lib/systemd/system"
  8. "systemctl enable pt-poweroff.service"
  9. Now, when you quit UAE and execute either a "shutdown now" or "poweroff" command, your pi-top will actually turn off!
Sound via pt-speaker
  1. This was the most difficult part of the installation. It took a lot of guesswork and I don't know if I recall every step. You may need to refer to the instructions on github to figure it all out. This is what worked for me in the end.
  2. "apt-get install -y python-smbus wiringpi i2c-tools"
  3. "cd /etc/apt/sources.list.d"
  4. "nano pi-top.list" (or use another editor)
  5. add this on it's own line in the file: "deb http://apt.pi-top.com/raspbian/ jessie main"
  6. Save and exit
  7. "wget http://apt.pi-top.com/apt.pi-top.com.gpg.key"
  8. "apt-key add apt.pi-top.com.gpg.key"
  9. "mkdir /etc/xdg" (it might already exist and that's fine)
  10. "mkdir /etc/xdg/lxsession" (it might already exist and that's fine)
  11. "mkdir /etc/xdg/lxsession/LXDE-pi" (the pt-speaker package expects this directory to be here to install correctly even though we don't need it)
  12. "apt-get install -y pt-speaker"
  13. Add this line to /etc/rc.local before "exit 0": "/usr/bin/pt-speaker &" (this initializes the speaker when your computer starts)
  14. Reboot with either "reboot" or "shutdown -r now"
  15. You should now be able to hear audio. Test it out with Eagle Player and listen to a MOD file. If you are unable to hear audio through the pt-speaker, check out the troubleshooting info in the instructions.

There you have it! A fully functional Amiga laptop... with a not so great keyboard... but all, in all, it's a great device! If you want to boot into a UAE configuration without the menu appearing first, just uncheck "Show GUI on startup" in the F12 menu, under "Miscellaneous" and change "./uae4arm -f conf/autostart.uae" in /root/.profile to point to your prefered configuration, such as "./uae4arm -f conf/A4000\ Turbo\ v2.uae".

Check back in a little bit. I may post a summary of the steps needed to get WHDLoad configured to play almost every game and demo ever made for the Amiga. WHDLoad is already installed in Classic Workbench, but there's some more work to do to get it working. You can read about it here, or check out Nostaligia Nerd's quick video overview here.

It is likely that I missed a step or have a few typos. I completed this project over a few days and documented everything very late at night a few days after I finished. Please share your questions and suggestions in the comments below. Note that comments are moderated so yours may not show up immediately. Thanks and good luck!

- Duane

September 2nd, 2016:
My Home Server Closet Is Overkill

TLDR; I’m the king of overkill, but I want to do things the right way. I installed a managed switch just to have my DTE Smart Meter Energy Bridge in my server closet.


Server ClosetI got the DTE Energy Bridge for my Smart Meter a few weeks ago. My server closet is the best place for it, but I’m out of ports on my 24-port switch, so I temporarily installed it in my theater using an Ethernet jack on the wall. Having it dangling there drove me nuts, but I knew that I would remember to install it correctly if it was kept in plain sight.

When we moved into our current house, I made running Ethernet to (almost) every room a priority. Gina was a real trooper and helped crawl through the attic, pass cables through walls, and even dig into insulation to find lost cables where my hands wouldn’t fit. I built everything around a freecycled telecom rack with some rackmount shelves installed. All in all it has worked well and been through a few dozen iterations. But it has had a 24-port patch panel (rescued from the trash at work), a 24-port unmanaged switch, cable modem, router/access point, media server and web/home automation server.

Computer RackAfter 10 years I had run out of ports on the switch and my server closet is in a perfect location to install the DTE Energy Bridge: ~15 feet away from the exterior wall where the Smart Meter is installed. I had a few rarely used network devices that were unplugged to save ports as well (a/v receiver, bluray player, etc. that I only needed connected to update firmware). It was time to upgrade.

I decided to buy used since enterprise and small-business organizations alike tend to upgrade their network hardware regularly. I found a great deal on a Netgear ProSafe GSM7224 Managed Gigabit switch on ebay ($25, shipped). It arrived in used, but fair condition… and missing one of the rackmount ears. So, I set it aside along with the patch panel to deal with another day.

Network Panels and Smart Meter Bridge"Another day" happened today when I finally had some time off of work to do maintenance in my server closet. I fabricated a rackmount ear out of a generic ear for Belkin hardware that I had laying around and attached it to the switch. After re-configuring the rack once again (moving shelves, keyboard trays, etc. around), I installed the new switch and patch panel. The switch was configured by the previous owner in a way that wasn’t working for me. So, after a factory reset and network speed test, we were up and running.

Finally, I moved the Energy Bridge into the server closet, plugged it into the switch, mounted it to the interior wall and called it a day. Most people would have just unplugged something and been done with it. That would have driven me nuts. 2 hours later and I feel like I actually accomplished something… what that is, I’m not sure, but I know I did it the right way.

- Duane

August 30th, 2016:
Lessons Learned By A New Father (Part 1)

Here’s the first installment of stuff I’ve learned in the past 10 weeks of new fatherhood:

    Stay Puft Baby and Dad
  1. The first 2 weeks are tough. More difficult than you can imagine. Everyone says this. You think you know what it means. You’re wrong.
  2. Weeks 3-4 are better than the first two… but your brain will be erased and you won’t remember how bad 1 & 2 were. Weeks 3-4 are about as bad as you imagined 1-2 could be before baby arrived.
  3. After week 6, it gets a lot better. You come out of the haze and really realize that this new person is in your family. By week 10, you’re interacting with her and you can barely remember the first month.
  4. Take lots of pictures/videos. Everyone tells you that it goes by so fast and they grow too quickly. It’s true.
  5. Diapers aren’t as bad as you imagined… especially if baby is nursing. The first few days are a horror show (meconium), but really, it’s not too bad.
  6. There will be blow outs… big time. My wife is a scientist and bought a case of “blue pads” used for surgeries, etc. We put them on the changing pad as well as line her car seat with them. Keep a few in your diaper bag for impromptu changing. Lastly, make sure the “seal” around baby’s legs is good by pulling the diaper up on her waist after securing it… like you’re putting a pair of shorts on her. Nothing can stop the dreaded “rooster tail”… it’s just going to happen some day(s).
  7. Gripe water works. All of the articles/books I read said that there’s no scientific evidence for it to work (our baby showed no signs of colic, so that may be a different story), but a dose of gripe water and a little patting on the back and she produces some of the most amazing belches and stops crying
  8. Your wife will need a break… especially if she’s nursing. As soon as you can prepare a bottle and baby is ready to accept it (check with your pediatrician), offer to take the last feeding of the night and put her to bed… or tell your wife to go out shopping for herself and stay home and feed baby. (Just make sure you time everything right so that you have enough milk and/or mom comes back in time.)
  9. A bedtime routine is key. Our baby has slept in her room, in her crib, since she was 2 weeks old (before that we tried a bassinet in our room). Having a bedtime routine was key to making that happen. On bath night, she gets a warm bath… but otherwise, it’s the same every night: mom puts on a lullaby and dims the lights. I undress baby and change her diaper (if needed). Mom applies night time lotion. I put baby in her swaddle. Mom feeds baby. Usually she’s asleep by the end of the feeding and mom waits 20 minutes, then puts her in her crib. 90% of the time, that works. The other 10%… well… all bets are off
  10. Speaking of swaddles: they work… just be sure that you follow the instructions for your swaddle blanket or quick-swaddle. Talk to your pediatrician about positioning baby’s head. Baby should always sleep on her back.
  11. We found out about swaddles in on of our classes, but we also learned about the 5 S’s for getting baby to calm down/sleep from “The Happiest Baby On The Block” by Dr. Harvey Karp: Side, Swaddle, Shush, Swing, Suck. Look it up… it helps, but as you’ll find, nothing is a guaranteed solution
  12. We’ve always cooked dinner together, and doing that with baby is a challenge. We found that a bouncer or car seat on the kitchen counter (if you have space) works well. We tried wearing her in a front-carrier, but worried about hot spatter from pans could get her. Of course, be careful with cutlery, spices, or other hot liquids.
  13. Bonding time helps. If you’re only holding baby when she’s crying, that’s all that you’re going to get out of it. Make time to play with baby (tummy time included) and I find that just a minute of fun when changing diapers or getting dressed means a lot before my day starts or before baby goes to bed.
  14. Teamwork helps. My wife and I have always teamed up: hobbies, chores, projects, and now baby. We calm each other down and cover for each other when we’ve just had enough. Teamwork can be fun too… and makes bath time a lot safer.

Well, that wraps up my first installment of lessons learned. There’s a ton more and I’ll try to provide ongoing updates.

- Duane

July 3rd, 2016:
Car Update: Camaro Emerges

After many struggles with my Firebird I finally got it started, only to confirm that my last hurried fuel line repair wasn’t good enough. So, I took a break to focus on my 10-year newer old car: 1999 Camaro. It has been sitting for over 2 years, but I thought it would be a better candidate to get on the road. I removed the cover, knowing that I had some mildew to deal with in the interior… however, I also discovered that I had left the passenger window open about an inch. More than large enough to let mice in and definitely enough to let the stink of my old pole barn set in. We had some work ahead of us: deep cleaning, odor elimination, flushing fluids, cleaning out acorns and mouse nests. [peg-image src=”https://lh3.googleusercontent.com/-elNiu7Ad0rg/V3g0OlABdnI/AAAAAAAA8nA/J5OF3Ktg_j8sYx0e1EXaq1qQacKTQ_TDwCHM/s144-o/IMG_2085.JPG” href=”https://picasaweb.google.com/106726501754907162579/6302845105978564881#6302845103560029810″ caption=”” type=”image” alt=”IMG_2085.JPG” image_size=”3264×2448″ peg_single_image_size=”w240-c” ] [peg-image src=”https://lh3.googleusercontent.com/-6bruQq4iU88/V3g0OuGMOUI/AAAAAAAA8nA/2OchZ3COcgcvnwnDvb4XbImFEyG27WMKACHM/s144-o/IMG_2084.JPG” href=”https://picasaweb.google.com/106726501754907162579/6302845105978564881#6302845106001819970″ caption=”” type=”image” alt=”IMG_2084.JPG” image_size=”3264×2448″ peg_single_image_size=”w240-c” ] [peg-image src=”https://lh3.googleusercontent.com/-6RxE1IG0gIo/V3g0OtInI_I/AAAAAAAA8nA/SD8qTOsgOCcaJ932DF3ax2veUIqSfAX1QCHM/s144-o/IMG_2083.JPG” href=”https://picasaweb.google.com/106726501754907162579/6302845105978564881#6302845105743537138″ caption=”” type=”image” alt=”IMG_2083.JPG” image_size=”3264×2448″ peg_single_image_size=”w240-c” ] [peg-image src=”https://lh3.googleusercontent.com/-jFBThfAyI54/V3g0OiXOzEI/AAAAAAAA8nA/yNjk4ZP4auk1qPDvDaW9wndJY0OOyGOVgCHM/s144-o/IMG_2082.JPG” href=”https://picasaweb.google.com/106726501754907162579/6302845105978564881#6302845102852066370″ caption=”” type=”image” alt=”IMG_2082.JPG” image_size=”3264×2448″ peg_single_image_size=”w240-c” ] [peg-image src=”https://lh3.googleusercontent.com/-Oj5Cuh72bWs/V3g0Om80A2I/AAAAAAAA8nA/9a4zYz22jQ4RMKNYc5Gfb-yUUPER9wYGQCHM/s144-o/IMG_2081.JPG” href=”https://picasaweb.google.com/106726501754907162579/6302845105978564881#6302845104083436386″ caption=”” type=”image” alt=”IMG_2081.JPG” image_size=”3264×2448″ peg_single_image_size=”w240-c” ] [peg-image src=”https://lh3.googleusercontent.com/–otztXderos/V3g0Oi–_tI/AAAAAAAA8nA/i5fqH6P3QQc6W5kRzwnh-dwiNFbf4awXQCHM/s144-o/IMG_2080.JPG” href=”https://picasaweb.google.com/106726501754907162579/6302845105978564881#6302845103018802898″ caption=”” type=”image” alt=”IMG_2080.JPG” image_size=”3264×2448″ peg_single_image_size=”w240-c” ] During the next 2 weeks, I spent the better part of 3 days cleaning the interior and prepping the engine. The only surprise was a mouse mess to clean up in the C pillar that I missed on my first pass. I used our commercial carpet cleaner, baking soda, Lysol disinfectant, water/vinegar, clove/water (to prevent mildew), and eventually bleach/water. Ultimately the mild bleach solution was most effective at neutralizing odors. I let my car bake with the roof off and doors open in the sun. All in all, there is a marked improvement in odor. Continuing to let it air out in our garage that has just recently been upgraded by Insta Garage Doors of San Bernardino county, has continued to help. However, as I let it run (trying to work through the fuel/stabilizer in the gas tank, it started to overheat. Yesterday, I replaced the the thermostat, but the old one looked like new. I’m hoping that I just failed to bleed all of the air out of the cooling system last time (which is a common issue with aluminum block LS motors). If that’s not it, a replacement radiator cap might be the solution… but I dread that I could have a bad head gasket and air/oil is getting into the coolant. Though my time is limited at the moment, I hope to figure out what’s going on before my birthday in mid-July. I just want to drive it around for 1 day… [peg-image src=”https://lh3.googleusercontent.com/-rANak572jhE/V3g0OhcHRCI/AAAAAAAA8nQ/kCd15WiZS8sg7J-tnaff1OWs1tfBtEjjACHM/s144-o/IMG_2100.JPG” href=”https://picasaweb.google.com/106726501754907162579/6302845105978564881#6302845102604108834″ caption=”Look at ’em there, pretty maids all in a row.” type=”image” alt=”IMG_2100.JPG” image_size=”3264×2448″ peg_single_image_size=”w640″ peg_img_css=”aligncenter” ]

- Duane

Devtroit